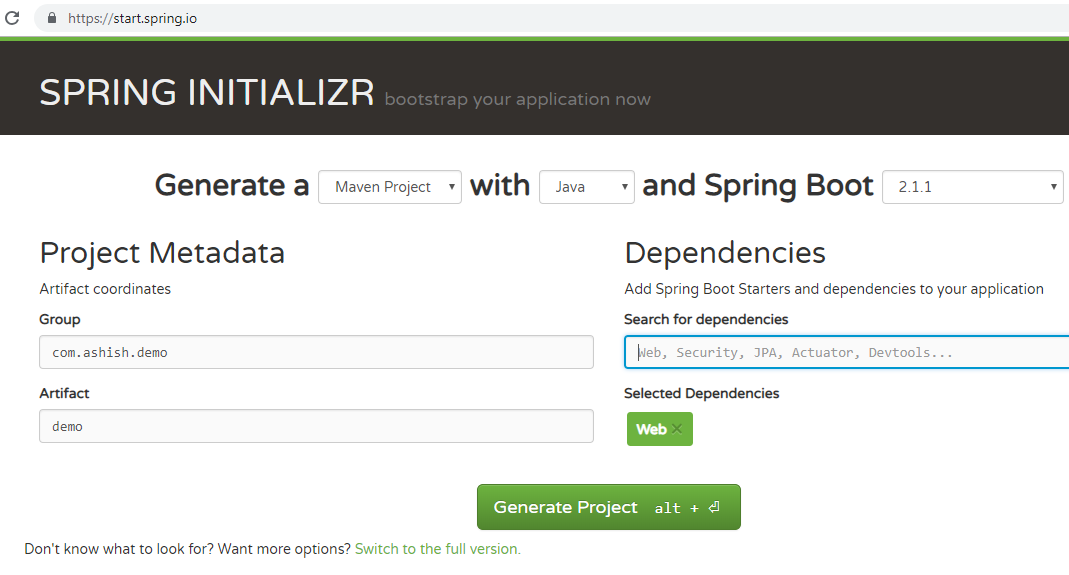
First, we are going to download Spring Boot boilerplate
code from https://start.spring.io/
Code from "DemoApplication.java"
package com.ashish.demo;
import
org.springframework.boot.SpringApplication;
import
org.springframework.boot.autoconfigure.SpringBootApplication;
@SpringBootApplication
public class
DemoApplication {
public static void
main(String[] args) {
SpringApplication.run(DemoApplication.class, args);
}
}
Then we are going to add a class “Book” to project:

Add this code to the Book.java file:
package com.ashish.demo;
public class Book {
long id;
String name;
String author;
}
Then using the "Source" option from context menu, we are going to generate "toString()" method, getters and setters for the class variables and the constructor for the class.

Next, we are going to add a class "BooksController" that we will be handling the requests for the REST service.
package
com.ashish.demo;
import
java.util.Arrays;
import
java.util.List;
import
org.springframework.web.bind.annotation.GetMapping;
import
org.springframework.web.bind.annotation.RestController;
@RestController
public class BooksController {
@GetMapping("/books")
public
List<Book> getAllBooks(){
return Arrays.asList(new Book(1l,
"Harry
Potter",
"JK
Rowling"));
}
}
A word about the annotation @RestController:
It marks the class as a "REST Controller".
@RestController is a convenience annotation for creating Restful controllers.
It is a specialization of @Component and is autodetected through classpath scanning.
It adds the @Controller and @ResponseBody annotations.
It converts the response to JSON or XML. It does not work with the view technology, so
the methods cannot return ModelAndView.
It is typically used in combination with annotated handler methods based on the
@RequestMapping annotation.
The
@Controller annotation is used with the view technology.A word about the annotation @GetMapping:
It marks the method to handle HTTP Get Requests.
We configure our application for HTTP port in the application.properties file by adding the following property:
server.port=8082
Next, from the context menu of the DemoApplication.java we are going to launch the application as "Java Application":

From the logs below we see that our server is started and listerning to HTTP requests/responses at port 8082.
2018-12-15
21:12:22.450 INFO 8344 --- [
main]
o.s.b.w.embedded.tomcat.TomcatWebServer
: Tomcat started on port(s): 8082 (http) with context path ''
2018-12-15
21:12:22.450 INFO 8344 --- [
main]
com.ashish.demo.DemoApplication
: Started DemoApplication in 3.562 seconds (JVM running for 4.152)
2018-12-15
21:13:48.003 INFO 8344 ---
[nio-8082-exec-1] o.a.c.c.C.[Tomcat].[localhost].[/]
: Initializing Spring DispatcherServlet
'dispatcherServlet'
2018-12-15
21:13:48.004 INFO 8344 ---
[nio-8082-exec-1] o.s.web.servlet.DispatcherServlet
: Initializing Servlet
'dispatcherServlet'
2018-12-15
21:13:48.014 INFO 8344 --- [nio-8082-exec-1]
o.s.web.servlet.DispatcherServlet
: Completed initialization in 10 ms
Next,
we make a request to our REST service from the browser and see what response it is sending:

No comments:
Post a Comment